
Showing posts with label BA5. Show all posts
Showing posts with label BA5. Show all posts
Wednesday, 20 February 2013
Southmere demo: Adding glass to the house
So after handing in BA5 I looked over my model and felt that the house needed glass windows. I wasn't sure when I first created the model of how to do so since the only way I know how to create glass is with a mia_material, this is an issue for me since I don't know how to get this material into UDK. Hopefully I will be able to learn how to do this. Anyway here is a screen shot render of what my model would look like if it did have a window.


Thursday, 14 February 2013
BA5 - Demo
So through working on Maya and going through various different assets and tweaking them I have produced some screen shots of how it's going and what I changed in order to get the desired effect.
 |
| A before shot after exporting a near finalized model of the interactive house |
 | |
| After shot of the interactive house after changing the wall texture to a better one |
 |
| Adding dirt and grime to the house texture to give it more depth and detail |
Here's a step by step guide on how to do so. First you need to bring up the Hypershade window. To do this go to 'Window', 'Rendering Editors' and then Hypeshade. From here you then need to make sure that 'Mental Ray' is enabled, if not then you need to go to 'Window', 'Settings/Preferences', 'Plug-in manager' and then scroll down till you see 'Mayatomr.mll' and tick the 'Load' and 'Auto-load'. From here you should then have a drop down menu for different mental ray shaders in the Hypershade window.
Step 1 - Create a 'Surface shader' in the work area within the hypershade window


Step 3 - Middle mouse button the surface shader and drag that on top of the mib_amb_occlusion

Step 4 - Click 'Default'
Step 5 - It'll create a connection as shown

Step 6 - Middle mouse button the surfaceshader and drag it onto the selected object in the viewport you wish to create an ambient occlusion for.

Step 7 - Once you have done this the asset should look black like this

Step 8 - Now it's time to change the settings of the surface shader through it's attributes, of course these settings will depend on the the user and what and how much they want to change but for mine around the 256 mark on the samples is good for me and then about 1.2 on the spread. The higher the spread the more there will be lots of dark areas so it's best to experiment with it.

Step 9 - Now it's time to bake on the occlusion map to the model. To get to this hold down the space bar and keep holding over the model and go down to 'lighting/shading' and left click, still holding the space bar and then left click on the option 'batch bake (mental ray) and the little box to the right of that, this should bring up the window. When doing this there are a few settings that need to be looked at, the first of which is make sure that the option 'bake shadows' and 'use bake set override' is ticked. There will now be a drop menu under 'Texture bake set override' and there will be a drop down button called 'colour mode', make sure this is set to occlusion. Then you can change the 'occlusion rays' to 256 if desired. From here I changed the X and Y resolution to 1024 so when later in Photoshop I can put my original texture into place without a problem being the size. I also changed the prefix to OCC_ so that when I look for the file it'll have the asset name with OCC_ before it. Only other option I changed is the type which I put it to TGA.
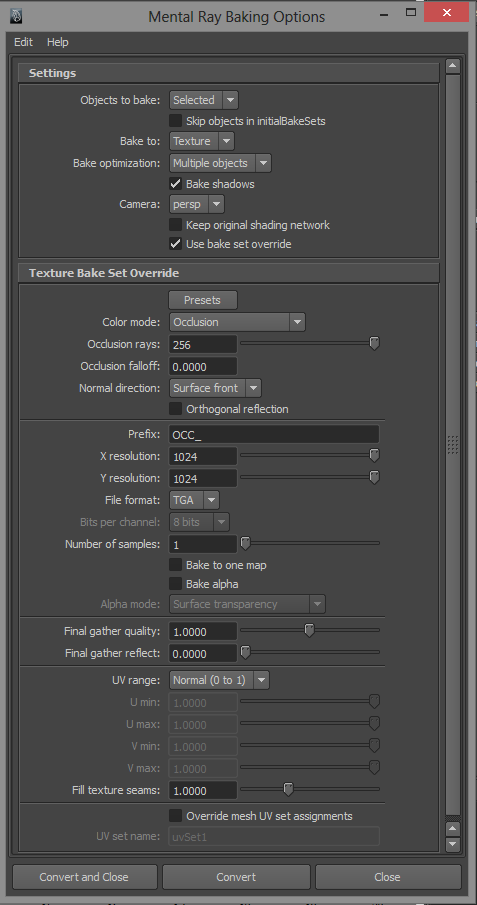
Step 10 - Then I clicked Convert and wait for the process to finish.
Step 11 - Once finished my model then looked like this

Step 12 - Locate the file in Photoshop through this way; your project folder, renderData, mentalray, LightMap and then the file should be (in my case) OCC_House1. Once in Photoshop you have the layer loaded you will need to double click on the layer from where it is locked and changed the name in the pop up window that now should have appeared and change it to something like Occ. Then change the Blending mode on that layer to multiply, from here open up your texture file and drag that into the file with the occlusion map loaded up. Put the texture file underneath the occlusion layer and you should have something like this.

Step 13 - Now you got this far add a new material to the object in maya, can be something like a lambert and link the texture file with occlusion included to it and you should end up with something like this.

So now that I have add occlusions maps to my models I then moved onto roughing the textures up a bit and changing them since I didn't feel happy with them.
 |
| Before |
 |
| After |
 | |
| Before |
 |
| After |
 |
| Before |
 |
| After |
 |
| After changing most of the textures here's the end result |
So all that was needed now is to export everything over to UDK, create new materials and link everything the the static mesh models and create some collisions.
To create some collisions for some of the assets such as the house I have to create a polygon surrounding the area I wanted to have the collisions set to and changed the name to UCX_ so that UDK would pick it up as a collision, then after naming it UCX_House1 for instance I changed the transparency to 0 so that it wouldn't be visible within the game engine. I then selected both the collision and model and exported the selection, from here I imported it into UDK, assigned the texture material and set it into position in UDK. After doing this for some of the buildings and assets and using Auto-convex collision for the rest I set out to create some lighting however this didn't work as well I wanted it to. I did this through clicking on the option to build lighting. However I added some spot lights and other lights through the Content Browser and then Actor tab and lighting options and placed a few lights. I already created a new level with night time lighting since this suit my game and it's mood. From here I then played around it a bit in the Engine to see if everything was right and to scale and also checking that the collisions worked. I scaled everything down a bit to make sure it fitted around the players height and here is the end result in video form :)
Monday, 11 February 2013
Textures - BA5
So after going through several textures either ones I created in photoshop using different brushes or ones off a texture website such as cgtextures.com/ [1]. I came across a website which has texture packages for sale, so for a small price I bought a medieval wall texture package from contentparadise.com/ [2].
Here's a preview of the textures;
/ISOURCE%20MEDIEVAL%20STONE%203D%20%20-1.jpg) 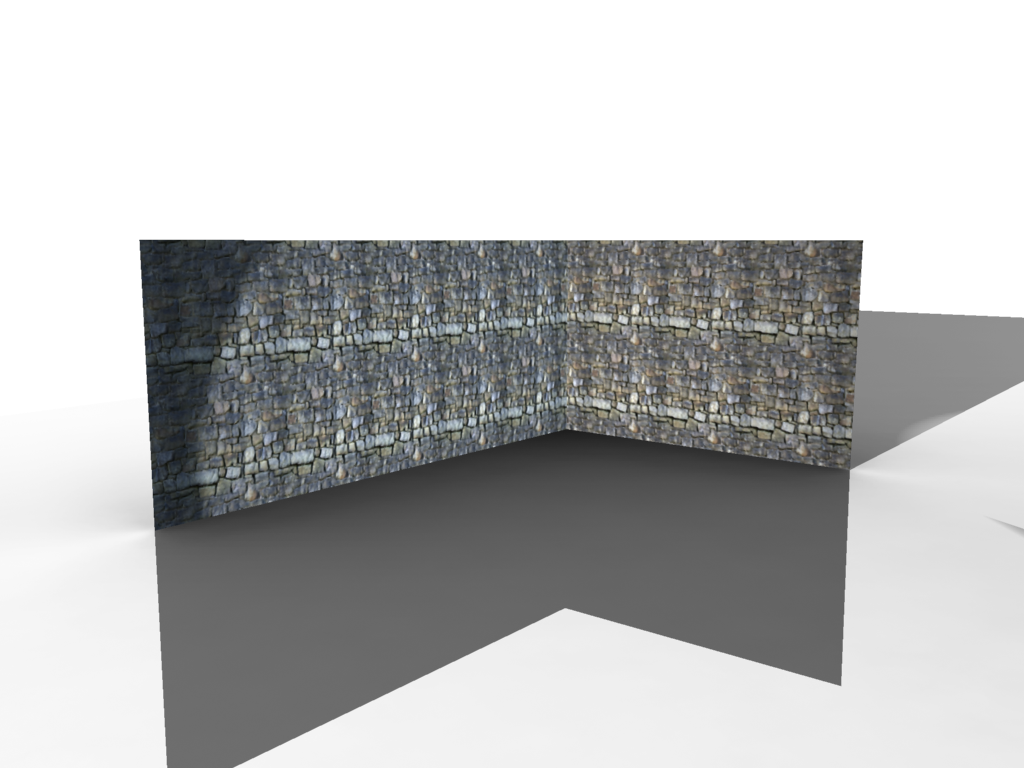 |
| Textures applied and rendered |
Thursday, 7 February 2013
Exporting my assets into UDK - BA5
Following on from the previous screenshots I have been creating smaller assets to create some detail and characteristics for the design. Whilst doing this I have also UV Mapped all the major buildings and most smaller assets, I have textured the main interactive building up to an extent; I have textured just the front to see how the texture would look.
Here's an image of the textured house:
Today though I had a tutorial on how to export our models and assets into the UDK game engine along with how to add the textures through material files. Thanks to Jess Smith I have a step by step guide of how to get the assets into UDK and add the material textures to the model in the engine.

Overall I am very happy with how this turned out, all my assets seemed to export over nicely and none went crazy on me. I still have the textures to do but least I know now that my assets can easily be exported into UDK without a hitch (so far).
Here's an image of the textured house:
 |
| ignoring the sides of the house as in game they won't be visible so no texture will be added |
Importing
and Exporting to UDK/Boss Notes
· -UDK sometimes needs to have your
model/assets combined before you export to the engine. In our case, we must
combine our objects and save as a separate FBX file to ensure it works in UDK.
·
You can’t use the Maya 2D textures in
UDK.
· -For your textures ensure you keep a
PSD of the layers for the diffuse, specular and normal maps and you can use TGA
files for each of the maps separately so they can be placed onto your model and
loaded through Maya.
-File > export selection > in the directory go to the right and select “smoothing group” > under file name drop down select FBX (if you don’t have FBX option/smoothing group go to window > settings preferences > plugin manager > tick 2 boxes to allow FBX & smoothing group) > name your file > click export selection.
-File > export selection > in the directory go to the right and select “smoothing group” > under file name drop down select FBX (if you don’t have FBX option/smoothing group go to window > settings preferences > plugin manager > tick 2 boxes to allow FBX & smoothing group) > name your file > click export selection.
· -
Open UDK > all programmes > game
engines > unreal development kick > open UDK editor (NOT GAME).
·
Content browser/Welcome > click new
map on welcome screen > select the time of the day you want your scene to be
in (usually early morning/late evening for best view) > close the other
windows.
· -
Right mouse tumble/rotates the camera.
·
-Left and right mouse at the same time
pans the cameras.
· -Select camera movement speed at the
top of UDK (next to the blue sideways triangle…play button).
· -
All your models are located in content
browser (next to the binocular icon at the top of UDK interface) select it >
go down to the bottom left of the content browser screen and select UDK game
folder > select the content folder > click new (with content highlighted)
> this will create your “package” which will have all your assets etc in it
> name your package > then under name call it whatever your model is
(i.e. museum study/bookcase) > ignore all other settings > click okay
> if the animation window pops up just close it.
·
-Now look under content > packages
> you should see your newly created package > when you select it there won’t
be anything within it yet > double click select your package > find your
FBX file that you created in Maya > click open and then click ok on the
import screen (if it says out of date FBX just click ok and ignore it).
·
-Now you will see your model on the
content browser (with your package selected) > middle mouse click your asset
and drag it into the UDK space.
·
-If your model is tiny select scale
model (next to drop down world button on UDK interface) so you can scale it up.
Putting
Textures into UDK
·
On content browser right click
(anywhere within the grey area) and select material from factory > in the
“new” pop up menu re name it accordingly > click okay and the Unreal
Material Editor window will pop up > your model and area will just appear
black because there are no textures assigned to your model within UDK yet >
you can temporarily close this menu > if you now look at the content browser
(your package) there should be a new icon labelled “material” > select new
icon > select import on content browser window > go to folder with
textures (specular, diffuse and normal maps) > now select the textures you
want > hit okay to all > now your textures should appear under your
package as new square icons.
·
-Now we want to link all the textures
(diffuse, normal and diffuse) to the model > double click material to bring
up material editor (screen where your model looks black) > we need to add 3
blank texture maps > on the top right corner of the window find
“TextureSample” > middle mouse click drag to the blank window OR hold “T” on
the key board, left mouse click grey area.
·
-Select any one of the black boxes >
then select any one of your textures in the content browser > click small
green arrow at the bottom right of the Unreal material editor > now the
black box should have the map you selected appear on it.
·
-Your model will still appear black on
the Unreal material editor so you need to drag the black small box (next to the
texture box you just assigned in the Unreal material editor) to the correct
map. For example if the first map texture you put in is a diffuse map, then
drag the small black box so that it connects to the word diffuse under the
Unreal texture editor. Repeat the process for each of your textures making sure
they are linked via small black box drag to their correct name. If you are
doing this correctly the ball in the preview will now appear textured and not
black. Make sure you save this now by selecting the green tick at the top left
of the Unreal material editor > do not close it yet > under material in
the bottom of the Unreal material editor screen > select material >
ensure two sided is checked > save again > now you can close this window.
· -
In the content browser double click
your static mesh icon in content browser > this brings up the static mesh
editor window.
·
-Now that your model is open in the
static mesh editor go back to content browser and left click once the square
icon that says “material” > go onto LOD info on the static mesh editor >
drop down the menu until you find “material” > click the small green button
(use selected object) > now you can close this window and view your textures
upon your model in the main UDK interface.
·
-To play and move around your object
press the play button on the main UDK interface (blue triangle button/alt +
F8/Play in Viewport).
At
this stage you should have a package which contains:
Static
mesh
“AnimSet”
Material
Any
texture maps you created (specular, normal and diffuse perhaps).
·
-You should save your package >
right click your package > and select save > your package will now jump
to under the UDK Games folder so you should save it again.
· -
When you re open UDK your model wont
appear because its not within the level, you must save your map, to fix this on
the main UDK interface select save under the file tab at the top of the screen
> save it as “Map Files”. Remember, there is a difference between saving
your level and saving your assets ;)
Adding
Collision Meshes
·
-Under the content browser/right click
mesh and select find in content browser > double click the square static
mesh icon under the content browser (in your package) > this opens the
Unreal static mesh editor > at the top you can easily select the button that
says “collision” > on the drop down menu select auto convex collision >
alter the settings for basic meshes > apply > then select “ShowCollision”
(green button at the top of the static mesh editor).
(Jess Smith)
(Jess Smith)
Here's a screenshot of my assets in UDK:

Overall I am very happy with how this turned out, all my assets seemed to export over nicely and none went crazy on me. I still have the textures to do but least I know now that my assets can easily be exported into UDK without a hitch (so far).
Tuesday, 5 February 2013


Wednesday, 23 January 2013
BA5 - Problems
Whilst creating little assets was good I was not happy with the work flow so I decided to make a start on the actual house that will be intractable. Whilst in the mist of doing this I faced many problems when creating it. Some of the problems I faced were ones such as creating the door from within a cube polygon, it was easy enough to use use edges to make a shape of a door frame big enough to with stand the door I have created but getting it to look right and have character was difficult. Then whilst trying to UV Map the general and simple building I discovered that I had forgotten to consider the walls of the house meaning I had simply created the shell of the house. So after much time thinking about how to create the walls I plunged into use the extrude tool to pull in the edges of the bottom faces to give me a wall sized gap around the edges, this caused all kinds of problems when trying to then turn it into a wall. I wasn't thinking clearly enough to think about a simpler solution and one that would be a lot more efficient and effective. So to do this I created a polygon cube, made sure that there were enough edges in the right places to map out a door frame, windows and a top lip supporting the upper structure. From here I then created another polygon cube that is slightly smaller than the main structure so that I could then place it inside allowing it to form walls inside the building. I made there were again edges lined up for the door frame, windows etc and created a step from which a person could step inside the house. I am now happy and confident with this building and it just needed me to think a bit clearer about how to do it, not overlooking it and using simple ideas.
 |
| Needs UV Mapping and then textures added |
Subscribe to:
Posts (Atom)