So through working on Maya and going through various different assets and tweaking them I have produced some screen shots of how it's going and what I changed in order to get the desired effect.
 |
| A before shot after exporting a near finalized model of the interactive house |
 | |
| After shot of the interactive house after changing the wall texture to a better one |
 |
| Adding dirt and grime to the house texture to give it more depth and detail |
Here's a step by step guide on how to do so. First you need to bring up the Hypershade window. To do this go to 'Window', 'Rendering Editors' and then Hypeshade. From here you then need to make sure that 'Mental Ray' is enabled, if not then you need to go to 'Window', 'Settings/Preferences', 'Plug-in manager' and then scroll down till you see 'Mayatomr.mll' and tick the 'Load' and 'Auto-load'. From here you should then have a drop down menu for different mental ray shaders in the Hypershade window.
Step 1 - Create a 'Surface shader' in the work area within the hypershade window


Step 3 - Middle mouse button the surface shader and drag that on top of the mib_amb_occlusion

Step 4 - Click 'Default'
Step 5 - It'll create a connection as shown

Step 6 - Middle mouse button the surfaceshader and drag it onto the selected object in the viewport you wish to create an ambient occlusion for.

Step 7 - Once you have done this the asset should look black like this

Step 8 - Now it's time to change the settings of the surface shader through it's attributes, of course these settings will depend on the the user and what and how much they want to change but for mine around the 256 mark on the samples is good for me and then about 1.2 on the spread. The higher the spread the more there will be lots of dark areas so it's best to experiment with it.

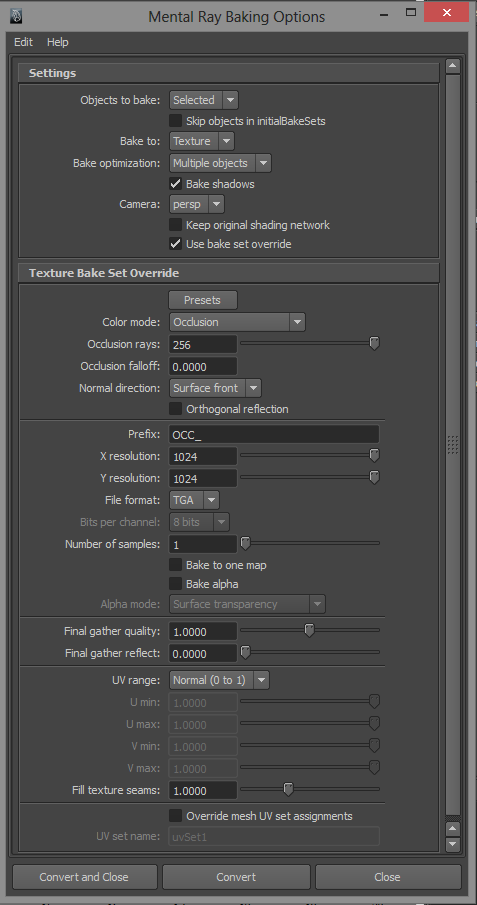
Step 9 - Now it's time to bake on the occlusion map to the model. To get to this hold down the space bar and keep holding over the model and go down to 'lighting/shading' and left click, still holding the space bar and then left click on the option 'batch bake (mental ray) and the little box to the right of that, this should bring up the window. When doing this there are a few settings that need to be looked at, the first of which is make sure that the option 'bake shadows' and 'use bake set override' is ticked. There will now be a drop menu under 'Texture bake set override' and there will be a drop down button called 'colour mode', make sure this is set to occlusion. Then you can change the 'occlusion rays' to 256 if desired. From here I changed the X and Y resolution to 1024 so when later in Photoshop I can put my original texture into place without a problem being the size. I also changed the prefix to OCC_ so that when I look for the file it'll have the asset name with OCC_ before it. Only other option I changed is the type which I put it to TGA.
Step 10 - Then I clicked Convert and wait for the process to finish.
Step 11 - Once finished my model then looked like this

Step 12 - Locate the file in Photoshop through this way; your project folder, renderData, mentalray, LightMap and then the file should be (in my case) OCC_House1. Once in Photoshop you have the layer loaded you will need to double click on the layer from where it is locked and changed the name in the pop up window that now should have appeared and change it to something like Occ. Then change the Blending mode on that layer to multiply, from here open up your texture file and drag that into the file with the occlusion map loaded up. Put the texture file underneath the occlusion layer and you should have something like this.

Step 13 - Now you got this far add a new material to the object in maya, can be something like a lambert and link the texture file with occlusion included to it and you should end up with something like this.

So now that I have add occlusions maps to my models I then moved onto roughing the textures up a bit and changing them since I didn't feel happy with them.
 |
| Before |
 |
| After |
 | |
| Before |
 |
| After |
 |
| Before |
 |
| After |
 |
| After changing most of the textures here's the end result |
So all that was needed now is to export everything over to UDK, create new materials and link everything the the static mesh models and create some collisions.
To create some collisions for some of the assets such as the house I have to create a polygon surrounding the area I wanted to have the collisions set to and changed the name to UCX_ so that UDK would pick it up as a collision, then after naming it UCX_House1 for instance I changed the transparency to 0 so that it wouldn't be visible within the game engine. I then selected both the collision and model and exported the selection, from here I imported it into UDK, assigned the texture material and set it into position in UDK. After doing this for some of the buildings and assets and using Auto-convex collision for the rest I set out to create some lighting however this didn't work as well I wanted it to. I did this through clicking on the option to build lighting. However I added some spot lights and other lights through the Content Browser and then Actor tab and lighting options and placed a few lights. I already created a new level with night time lighting since this suit my game and it's mood. From here I then played around it a bit in the Engine to see if everything was right and to scale and also checking that the collisions worked. I scaled everything down a bit to make sure it fitted around the players height and here is the end result in video form :)
No comments:
Post a Comment